How To Remove Rust While You Sleep

In his latest article Andrew addresses the issue of removing rust without damaging the integrity of your tractors body work.
WARNING:
This process produces flammable gas and should be only be performed outside.
Only use a low voltage battery - DO NOT use a mains power supply.
DO NOT use stainless steel anodes.
The Problem
One constant problem that we all have in our restoration work is the removal of rust, preferably with minimal damage to the base metal… and wouldn’t it be nice if there was an easy way rather than angle grinder with wire wheel or shot blasting?
NOTE: This method works for ferrous metals and should not be used with other metal components. Care should be used if the part to be cleaned has been hardened, e.g. springs, due to the risk of hydrogen embrittlement of the metal.
Having seen online references to an electrical method of rust removal, I finally decided to have a go and see if it works.
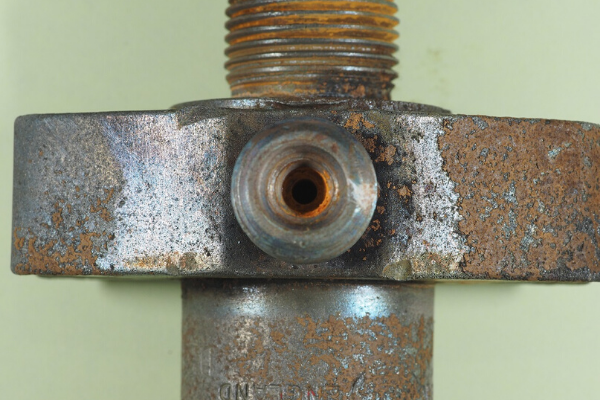
This injector body shows original rust (right) and almost cleaned (left.) Leaving the part to clean for longer would have removed yet more rust.
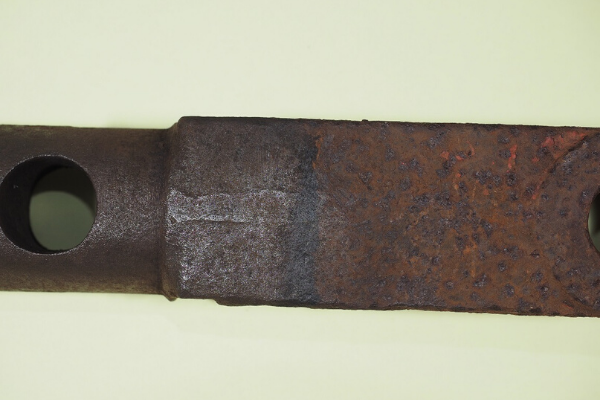
This part from the 3-point linkage is again part cleaned. This took about 8 hours in the equipment described later.
This process is not limited to small parts – there are accounts on the internet where it has been used to de-rust a whole trailer chassis in one go!
Basic Principles
This technique uses low voltage (e.g. 12V or lower) DC electricity with a cheap material (Sodium Carbonate, also known as washing soda – buy it at Tesco or other supermarkets) dissolved in water. A sacrificial piece or pieces of iron or steel (the anode) is made positive relative to the part to have its rust removed (the cathode.) Gradually the rust is converted back to either plain bright iron or a black iron oxide (probably Magnetite). The washing soda makes the water electrically conductive and also helps in the removal of any grease or oil on the surfaces.
This diagram shows the simplest concept. It does have shortfalls which are discussed later but makes the concept easier to understand. Other materials could be used for the anode but scrap iron or steel is normally readily available.
Multiple parts can be cleaned at the same time – simply suspend them in the tank together and connect each to the battery negative terminal.
A 12V battery provides the power (alternate sources are described later) with any old piece of iron or steel (not stainless) as the sacrificial anode and the part to be cleaned (preferably suspended above the bottom of the tank) as the cathode.
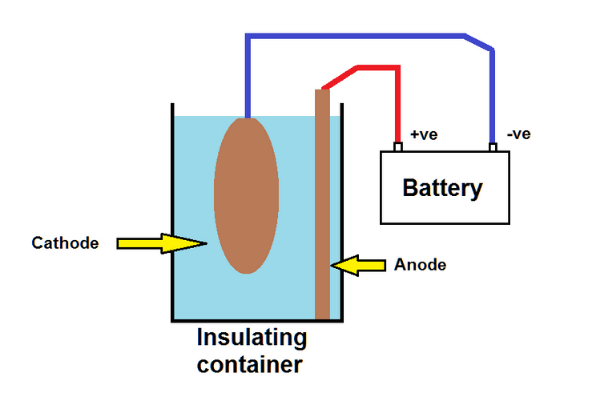
The insulating container can be anything large enough to hold the part or parts to be cleaned and is filled with cold water deep enough to cover the parts, or the parts could be cleaned in stages. The water contains a small amount of washing soda (about 1 to 2 desert spoons in 5 litres seemed to work well.)
The washing soda makes the water conductive and, for those old enough to have done electrolysis experiments at schools, this may start to look familiar. When the electricity flows, water is broken down into hydrogen (at the cathode) and oxygen (at the anode.)
The hydrogen reacts with the rust on the cathode to convert it to iron or a relatively inert oxide of iron, magnetite.
The oxygen in turn reacts with the anode iron to make more rust which often floats in the water – hence “rust soup”.
People have expressed concerns about using stainless steel for the anode due to the potential hazards of chromium compounds that could be released.
A Few Problems to Fix
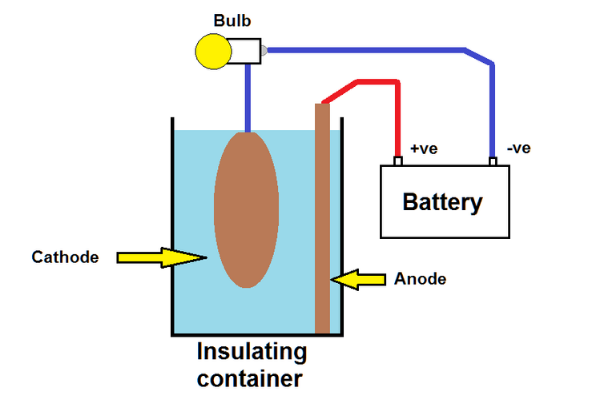
The previous example has one glaring hazard in that there is nothing to limit the current should the anode and cathode touch.
A very simple and useful way to solve this (which doesn’t generally get considered on most internet examples) is to use an ordinary 12V light bulb in series with either the positive or negative wire as shown here.
Most people seem to assume that 12V is needed for rust removal but in practice a lower voltage will work quite happily. The bulb provides both an over current protection and visual indication of what is going on – full brightness would indicate that the anode and cathode are touching (bad!), no illumination would indicate a wiring problem or lack of washing soda and anything else gives an indication of current. A higher wattage bulb will permit a higher maximum current and one could use bulbs (or twin filaments in a bulb) in parallel for still higher maximum currents. Choosing operating currents is discussed later.
Shadowing
The second potential problem is sometimes called “shadowing”. Electrical resistance depends on the distance between the electrodes. If they are close together as shown in these diagrams one side of the part being cleaned will be de-rusted faster than the other. De-rusting continues until all the rust has been converted so this isn’t a total problem, but for quicker cleaning it helps if the distance between all surfaces of the part to be cleaned and the anode is relatively similar. One way is to have a larger container so the path length differences aren’t too different but a much better solution is to use multiple anodes surrounding the part… or even a cylinder (e.g. an old engine liner for small parts.)
Power Supply
Using any mains source of power is a potential hazard, especially when mixing mains electricity and conductive liquids, so take special care if using anything connected to the mains.
The simplest power supply is a spare 12V battery – even an old battery will probably happily supply the relatively low currents required here, even if it will not manage to turn an engine over.
Many of the examples on the internet use a battery charger as the power source. Old chargers can sometimes be blown up (or fuses blown) if their output is shorted – the light bulbs solve this problem. Modern battery chargers will often shut down and report a fault if they are not connected to a battery, but they may well work with a battery connected and the rust remover connected to both.
If you feel confident working with electricity, old computers contain power supplies with 5V and 12V outputs which will provide plenty of power for this task. An internet search will provide examples of how to use them.
Other equipment power supplies potentially could be used – how about a left over mobile phone charger or similar? Some laptops use 19V power supplies which is a little on the high side but 5V from a USB charger should work ok for small parts.
Operating Current
So what current is the correct one? The simple answer is that there is no single numerical value– it depends on what one is trying to achieve.
As mentioned earlier, water is broken down into hydrogen and oxygen. Bubbles of hydrogen can help move debris (loose flakes of rust, dirt, oil, grease, loose paint etc.) but beyond a certain point all that is happening is that excess water is being broken down and the additional gas bubbles may actually slow down the conversion as local electrical current flow is broken. If there are a lot of bubbles around the part then the current is probably too high.
If there is deep rust (e.g. in the joint between two panels spot welded together) then a low current and plenty of time may be much more effective. Is it really a problem if something sits in the tank in the corner for a week if that clears the rust that can’t be reached by other means? Internet reports indicate that this can work with rusted threaded parts as an alternative to using heat.
A compromise may be used where cleaning starts with a higher current (to reduce total time and help cleaning debris) followed by an extended period at lower current levels. Very low currents, while taking longer, are likely to remove the finest rust particles.
Pre, Intermediate and Post Cleaning
It should be obvious that removing layers of mud and grease etc. before starting the process should reduce timescales and increase effectiveness.
On some heavily rusted parts it may help to give the item a light wire brushing after some initial electro-cleaning as quite a bit of surface rust could have been loosened. Flakes of rust will not be reattached to the part!
At the end of the electro-cleaning there will be a black surface layer. Some of this layer is loose and can be removed by brushing with a fine wire brush (the finer the better) – if rust remains then the electro-cleaning can continue.
At the end it is a matter of choice if the remaining black attached layer needs to be removed. If one wants an oiled finished then this isn’t necessary. It isn’t known for certain if phosphating works through this black layer but it is assumed that it will work as a good preparation for painting. The final black layer, while firmly attached to the bright metal, can be removed by fine wire brushing.
A Practical Example

This photograph shows the small test rig used to prove the electro-cleaning. It uses a bench power supply with independent adjustment of voltage and maximum current, 7 anodes connected in parallel and a single cathode connection via a crocodile clip to the part to be cleaned. A 12V 21W + 5W standard stop/rear light bulb was used for the current limit with both filaments joined in parallel. The wires were simply soldered to the bulb.
The part to be cleaned needs an electrical contact so the rust may need to be mechanically removed in a small area to allow an initial connection.
The container holds about 5 litres and 2 desert spoons of washing soda was enough to make the water conductive enough for operation. Increasing the washing soda concentration gave no significant increase in current – basically just a waste of material although it may have helped degreasing.
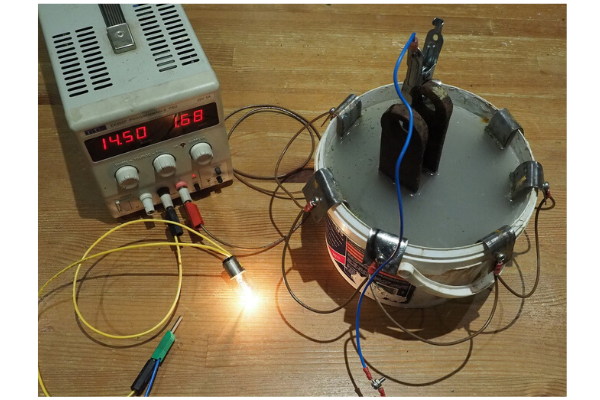
This photograph shows the rig in operation. The voltage was set to 14.5V (a typical charging voltage), the bulb is clearly on but not at full brightness and the indicated current of 1.68A is below the supply’s set current limit so determined by the bulb and conductivity of the water and electrodes.
A 12V 21W + 5W bulb would be expected to draw 26/12 = 2.17A if the anode was shorted to the cathode but actually was tested as drawing 2.25A. At 14.5V this increased to 2.46A giving a lamp output of 35.7W. [As a point of interest, this corresponds to a 30% power increase in the bulb with a hotter and brighter filament, so demonstrates the difference that high resistance in wiring and earths to bulbs can make to light output.]
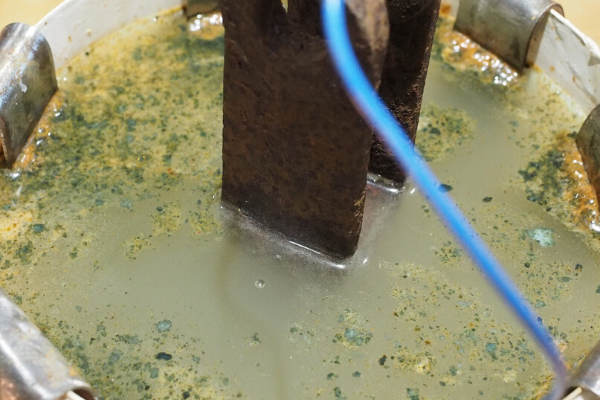
This photograph shows a close-up of the unit in operation. The green scum on the surface seems to be from the grease on the part’s surface while the brown scum around the anodes is rust forming as they are decomposed mixed with the soapy effect of the washing soda solution and oxygen bubbles.
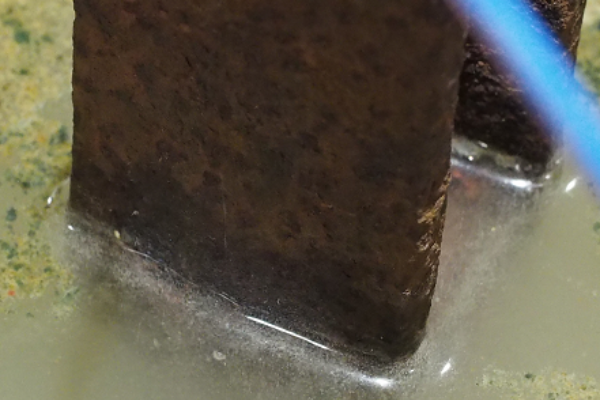
This photograph is a close-up of the part with hydrogen bubbles visible. If the current is too high and/or the washing soda too concentrated then a large mass of bubbles will form. If the part is withdrawn with the power on then some of the hydrogen bubbles may be ignited with a slight popping sound. This isn’t dangerous at these currents but if very high currents were used in a small enclosed area there could be a slight risk of a minor explosion so be aware.
Ideas For Use
Everyone will have their own ideas for how this technology may be used but here are a couple of suggestions that may help.
Large Items
There’s an example on the internet of de-rusting a whole trailer chassis. A wooden supporting tank was constructed and lined with a plastic sheet to hold the item. Obviously one needs to be careful not to pierce the plastic. The concentration of washing soda doesn’t have to be as high as in the earlier example and, unless a much higher powered low voltage supply were available, wouldn’t be of value. While sand blasting would obviously be quicker, this technology potentially could de-rust areas where the blast medium couldn’t get and without abrading the good metal.
More obvious examples for tractor restoration could be body panels and wheels.
Tanks
How does one clear the rust out of a fuel tank? While a metal tank wouldn’t be sensible as the anode (it would soon have holes eaten in it), if it were made the cathode then it could contain the washing soda solution and have a single anode suspended through the filler hole. This idea hasn’t been tried but would probably work.
Sand or gravel could be used to scour the surface after the rust has been removed and then everything pressure washed to remove the remainder.
The Chemistry
Understanding the chemistry of what is happening isn’t necessary to use the technology but is included in case anyone is interested.
The following is an engineer’s interpretation of what is going on - a chemist may be able to give a more correct explanation!
According to Wikipedia, there are 16 different types of iron oxide. For this process we are primarily interested in 2.
What we know as rust is Iron (III) oxides (formula Fe2O3.nH2O) and Iron (III) oxide-hydroxide (formula FeO(OH), Fe(OH)3). When this is formed there is a large increase in volume which causes the surface to flake and fall off, allowing rusting to continue. Water is needed as part of the oxidation process which is why rusting is minimal in a dry environment.
Iron (II, III) oxide magnetite (formula Fe3O4) doesn’t increase in volume relative to the pure iron so provides a degree of future rust prevention. This has been used for years for the bluing on guns. It is of interest that the historic bluing processes require the item to be carded (brushed with a fine soft wire brush) to remove loose surface material, just as is needed with these electrically de-rusted parts.
The hydrogen at the cathode reacts with the Iron (III) oxides and oxide-hydroxides to form Iron (II, III) magnetite. Any loose flakes of rust will fall off although some which are in the hydrogen will convert to magnetite and form a loose film over the part. This loose film needs to be brushed off as in the carding of blued steel.
Once the loose film has been removed the cleaned part should have some form of rust protection - oiling would be the classic method but phosphating and painting could be used as appropriate.
PHOTOGRAPHS BY ROBIN DARE
ARTICLE CONTRIBUTED BY ANDREW CHAPMAN
© ANDREW CHAPMAN & ANGLO AGRIPARTS LTD


Licence Terms
You are free to: Share, copy & redistribute the material in original format for any purpose as long as you follow the license terms below:
- Attribution – you must give appropriate credit and provide a link to the original article in a reasonable and visible manner
- You may not in any way suggest that the licensor endorses you or your use.
- No Derivatives – The material must be distributed in full, including disclaimer, you may not distribute or share modified material.
- No additional restrictions – You may not apply legal terms that legally restrict others from doing anything the licence permits.
- No warranties are given. The license may not give you all of the permissions necessary for your intended use. For example other rights such as publicity, privacy, or moral rights may limit how you use the material.
