Removing Broken Studs and Bolts - Tractors

Unfortunately, when working on old machinery, broken studs and bolts are a fact of life. The following provides a number of different approaches that have been helpful over the years and may provide some less obvious solutions.
It is assumed that cast iron and steel are the materials
involved. Aluminium castings are difficult to use heat on safely unless you
really know what you are doing as there is a risk of melting and/or warping.
For the small workshop, the drilling solutions are likely to be the safest for
aluminium or passing the job to a specialist.
Stuck threads usually are down to one or more of three main causes:
- Rusted in solid
- Cross threaded
- Too long a thread and jammed at the bottom of the hole
Depending where a break or damage occurs, different
techniques (sometimes combinations) are appropriate. If some of the object to
be removed projects then it may be possible to weld to it, but if broken off
flush or under the surface then some form of drilling will almost certainly be
necessary.
Heat
Most people are familiar with heating a stuck nut to cause it to expand and then unscrewing while it is still hot. One can actually heat a stud to get it out of a casting, but the process isn’t quite as obvious. See below under ‘Thread Re-forging’ for an explanation.
Sources of Heat
Oxy-acetylene is the highest temperature heat source normally available (3160 °C) and the only one that will work with the burning technique described later.
MAPP, Propane and Butane gas torch.
Different gasses burn at different temperatures:
- MAPP or MAP-X etc. (2,925 °C)
- Propane (2,020 °C)
- Butane (1,430 °C)
While more expensive than the other gasses and generally only available for more professional torches, the much higher temperature of the MAP-X type gasses are by far the best choice of the three.

Welding
A MIG welder (used with care to ensure that the stud doesn’t end up welded to the casting!) puts a lot of heat into a small area so can also be a useful tool.
Thread Re-forging
When a threaded object is inside a casting, heat applied to the stud conducts well down the stud but there is a degree of thermal insulation between the stud and the casting, increased even more if there is a layer of rust. This means that it is possible with a narrow flame to raise the temperature of the stud considerably while the casting remains relatively cool. This is particularly effective if some of the stud is outside the casting. Similarly, building up the exposed end of the stud by MIG welding can give quick localised heating but with the danger of welding the stud to the casting – possibly use a washer as a shield?
Heating the stud causes it to expand, but the threaded hole doesn’t expand anywhere near as much because the surrounding casting remains much cooler. Initially this crushes any rust and makes the stud much tighter still but, as the stud gets red hot, the threaded hole forges the stud – in reality the stud increases in length (slightly) as it can’t increase in diameter.
When the stud cools down the rust should have been pressed into the stud and the stud’s diameter reduced slightly. Assuming the stud was quickly headed to a bright red or yellow, it should now simply unscrew. Even
if it will not unscrew, the stud will normally will not be as tight so will
come out more easily with one of the other techniques described later.
Welded-on Extension
Various different types of extension can be welded onto the broken stud provided enough length extends outside the casting, subject to care needed to ensure the stud and casting aren’t welded together. The extension eventually provides something to help unscrew the stud while the welding heat provides the thread re-forging described earlier.
The thin aluminium from a drinks can is easy to cut/drill to make a shield that can be threaded around the stud to reduce the risk of MIG welding stud to casting.
Some suggestions are:
- Nut: If some thread is still available, a nut can be screwed/pushed/hammered on and then welded to the stud. The stud can then be unscrewed with a socket or spanner.
- Bolt: Butt welding the threaded end of a bolt onto a stud may make access for a spanner easier to use in some situations although it may be more difficult to get a good weld all round.
- Bar: Welding a bar across the top of the exposed stud (making it an ‘L’ shape) can sometimes provide enough leverage to get the stud moving. The bar may subsequently need cutting off to allow continuous rotation
Burning Out
Because the stud can heat up much quicker than the surrounding casting, by using oxy-acetylene with a fine nozzle it is possible to melt the stud and burn it out of the casting (extra oxygen) without damaging the casting threads. The trick here is to use the finest jet possible to heat the stud’s centre to the point where extra oxygen will just start it to burn – too large a jet or too much heat and the casting threads will melt too. Increase the oxygen and the stud should burn while the casting doesn’t. This is probably the most difficult technique to master!
An example where this was the only possible solution was an engine block where someone previously had broken a tap off in an engine mount fixing hole. Whoever broke the tap had a metric tap in a BSF hole and screwed in at a wrong angle! The tap was too hard to drill and too far down the hole to weld anything to it.
The tap was successfully burned out leaving the casting undamaged other than where the tap had cut some of the first one or two thread pitches. Running the correct tap down the hole cleaned everything up and there was plenty of full thread left.
Drilling and Milling
These techniques work equally well on all materials provided that the item to be removed isn’t too hard to machine, e.g. this will not remove broken taps.
The main difficulty with drilling out a stud is starting in its centre and keeping the drill aligned with the stud’s centreline.
When a stud breaks, it rarely does so with a nice flat surface with a perfectly centred hole. The following methods however will allow the central core of the stud to be drilled out, often by gradually enlarging a central pilot hole until the first signs of the thread becomes visible.
Once the thread becomes visible through the centre of the stud, if the hole is well centred then the remains are similar to a helicoil and can be unwound by first pressing the top edge into the central hole, gripping with long nosed pliers and unwinding.
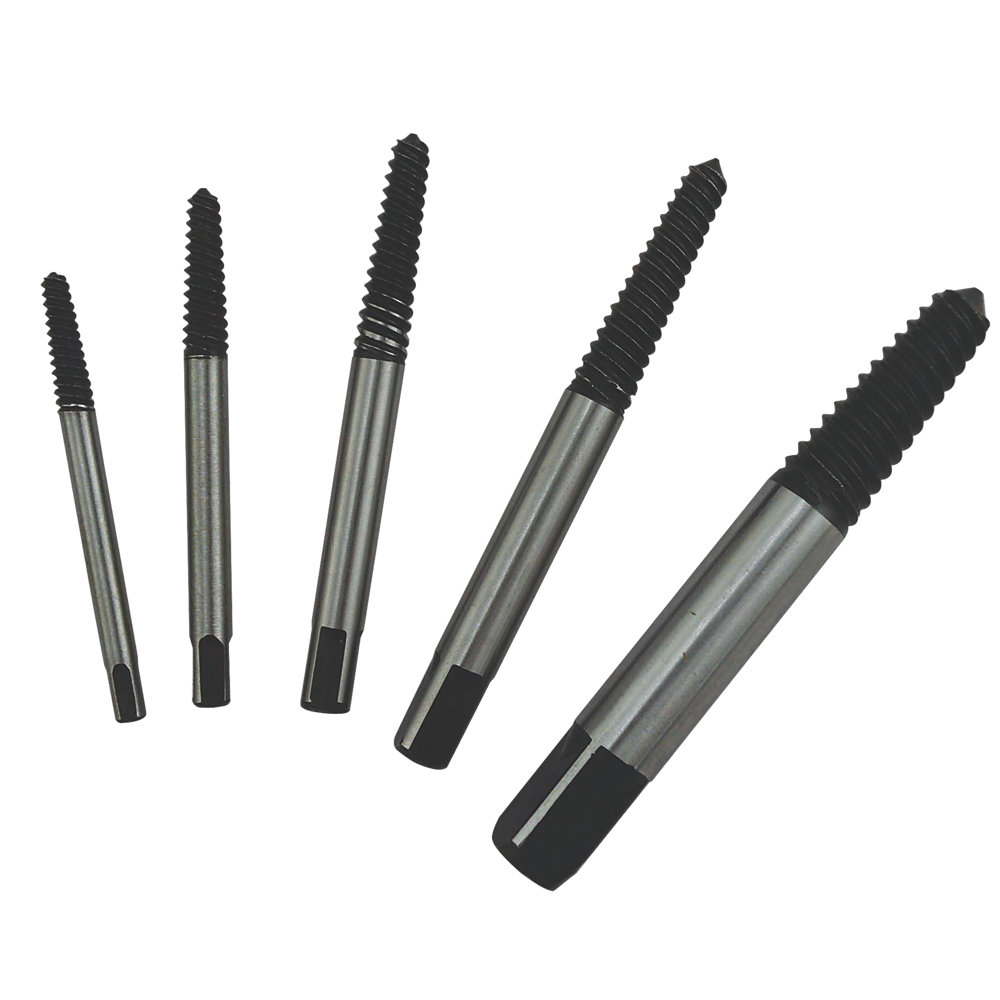
Alternatively one could use stud extractors such as these with a left-hand thread… but only with great care as they are very brittle and you can end up with one broking inside the stud you’re trying to remove. It is generally advisable to use heat on the stud (as described earlier) to loosen the rust and re-forge the stud before trying to use this type of extractor.
Accurate drilling of the central hole will determine if the process is going to be a success or not. Simply freehand drilling a hole without some form of guidance is likely to lead to a ruined casting so the following are suggestions that have worked well for the author in the past
Vertical Mill
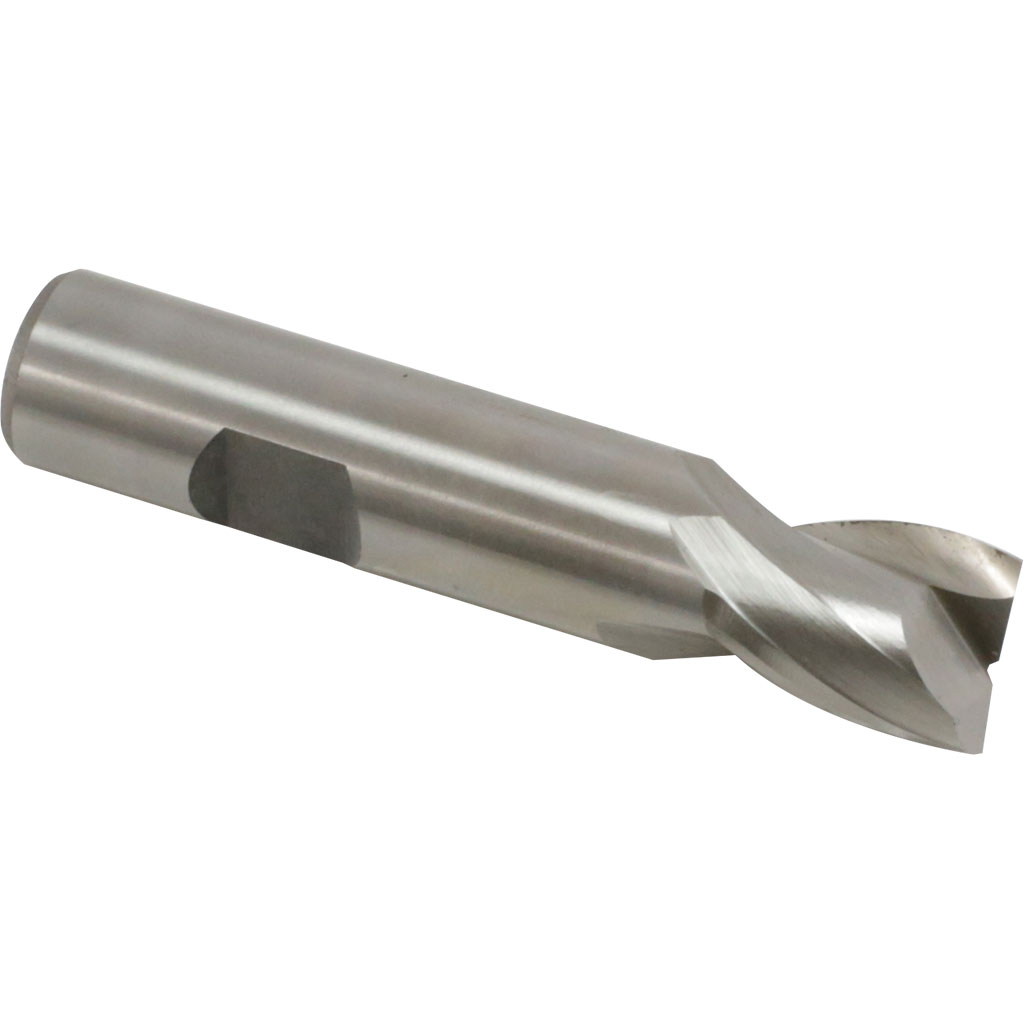
If available, a mill (or mill/drill) makes positioning relatively easy with the X/Y table allowing the cutter to be accurately centred over the stud. A slot mill (2 or sometimes 3 flutes) can drill a flat bottomed hole while being rigid enough to cope with the rough broken end of the stud. Normally one would use a slot mill slightly smaller diameter than the core diameter of the stud’s thread although an even smaller one could be used with several vertical passes moving sideways in small steps until the thread just starts to become visible at two or three locations around the hole.
Once the thread is starting to show in several places the remains should come out quite easily.
Drill with Guide Sleeves
This method works well if the stud has broken slightly below the surface of the casting and there is enough thread showing to guide ‘something’ into the hole. Alternatively, if the part that bolts onto the casting has accurately aligned holes, the part can be used for positioning.
The ‘something’ in this case is a sleeve that will just fit into the hole and having a small diameter central hole. The sleeve may alternatively benefit from being guided by a drilled block sitting on the front face of the casting to ensure that it is perpendicular to the thread.
The guide sleeve MUST be capable of being centred over the stud and perpendicular to it.
A small diameter drill can now be run down through the stud until it breaks out the back – typical casting holes will have been drilled and so there will be a recess between the centre of the stud and the casting hole, even if the stud had bottomed out. Take care not to drill too far or break the drill.
Once a pilot hole has been drilled, increase the hole in small steps (possibly 0.5mm increments when near maximum size) until the thread just starts to become visible – it will probably only show at one side of the drilled hole. The stud will often actually start to turn when drilling near the final size (unless it has bottomed out) which makes removal even easier. If not, a stud extractor should wind it out.
Custom Jig
Sometimes things go seriously wrong and it is necessary to be creative. One example was when stripping down a tractor’s brake housing, a bolt head (like in the centre of this photograph) sheared off leaving the none-threaded part of the bolt seized inside the housing to be removed.
The casting wouldn’t come off because the bolt was still screwed in. Putting a lot of heat on the casting wasn’t attractive, so some 3” of bolt needed to be accurately drilled out… not something likely to be easy by freehand drilling.

The brake casting from the other side was a mirror image of the one stuck so it was used as a jig to drill three holes in a piece of 2” x 3” timber. The two outer holes picked up the locations for two bolts that would come out while the third hole provided the position of the sheared bolt.
A guide sleeve was used to accurately drill down the centre of the sheared bolt and then the hole gradually enlarged using a hand held pistol drill. The casting eventually fell off and despite the deep hole, only about 10 thou of bolt wall was left on one side and no damage to the housing.
Freehand with Centre-punched Hole
If you have good eyesight, a steady hand and patience then this method can work, especially on shorter studs.
The first step is to ACCURATELY use a centre punch to create a starting hole in the centre of the broken stud. Initially the hole will probably be off-centre so angle the punch and hammer again to move it to correct alignment. Time taken to get this hole correctly in the centre and deep enough to locate the pilot drill will determine if this method has any chance of working.
Drill a small pilot hole through the stud guided by the centre-punched hole. Use a guide block (block of metal with a pilot hole perpendicular to the rear face) to ensure that the drill is perpendicular to the stud… or carefully check the drill’s angle with a set-square.
Expand the pilot hole in small steps, checking for any signs of breaking through into the thread. Do not drill into the thread.
This method is likely to leave significantly more of the stud still in the hole due to its accuracy limitations but, with care, works in most cases.
Spark Erosion
This requires specialist equipment and so is normally outside the capabilities of a small workshop. It can however remove very hard materials from any casting.
Taps
Assuming the stud has been successfully removed, it is always a good idea to run a tap down the hole to clean the threads and reduce the likelihood that the next one doesn’t get stuck too. For those who haven’t much experience with taps, it is worth understanding a little about the different types and their care.
For a given sized thread there are several different types of tap but the most common are as shown in this diagram. The lowest cost taps are carbon steel which are ok for general use. HSS (high speed steel) are harder wearing and less prone to breaking but at typically twice the cost.
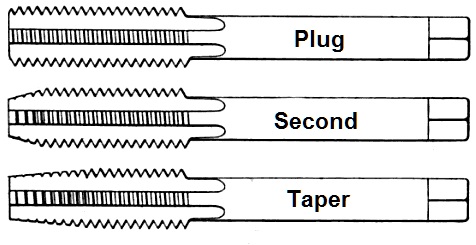
When starting an untapped hole or a damaged thread then the Taper is the best choice and usually a Plug tap to finish a blind hole.
Second taps as their name implies are often used after a taper and before a plug tap; in a deep hole one can sometimes get away without using one… but if you have one, use it. Some boxed sets only include taper and plug but seconds are included in the sets of 3 of a given size. Always take care when starting a tap to ensure that it is held perpendicular to the hole.
When tapping a hole, don’t try to force the tap too much or it will break, especially the smaller sizes… and then you’ll have a broken tap to try to remove! Typically rotate about half to one turn and then reverse to break any chips being cut. Special tapping compounds are available but grease is better than nothing.
Don’t try to tap full depth in one go. Keep taking the tap out to remove the debris, re-lubricate and continue.
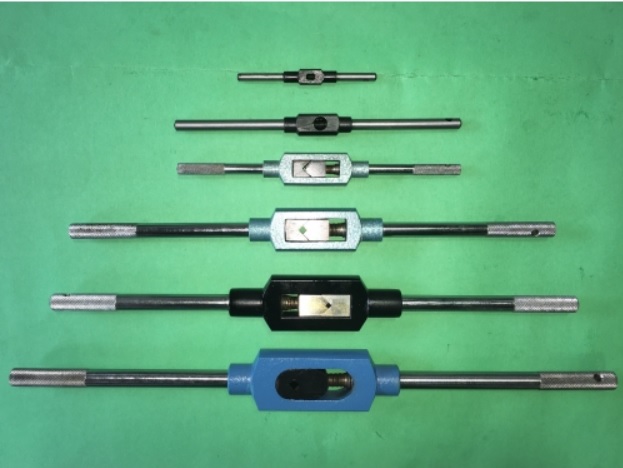
A good tap wrench is a worthwhile investment though several different sizes are likely to be necessary.
When cleaning existing threads it can sometimes be difficult to get in with a tap wrench so some way of extending the tap is often necessary. Don’t forget to look in your socket set as one can often find a socket that will fit the square on the tap, allowing extension bars to provide access and then a ‘T’ bar to turn the tap. A ratchet or any type of offset bar isn’t a good idea as off-centre forces will tend to push the tap off centre and greatly increase the risk of a damaged thread and/or broken tap.
Taps are fragile so look after your investment. One often sees taps for sale at auctions, tossed into a box and looking rusty – these are probably rubbish. Putting taps loose in a box damages their cutting edges which can be glass hard. Carbon steel is prone to rusting and it is the very sharp edges that rust first. New taps come in packaging so either keep that or wrap each tap in tissue or paper towel after oiling them.
Taps are available from a variety of sources online. I’ve used Tracy Tools for more than 20 years and have always found them helpful and good value. I’ve no connection with them other than as a satisfied customer.
ARTICLE CONTRIBUTED BY ANDREW CHAPMAN
© ANDREW CHAPMAN & ANGLO AGRIPARTS LTD


Licence Terms
You are free to: Share, copy & redistribute the material in original format for any purpose as long as you follow the license terms below:
- Attribution – you must give appropriate credit and provide a link to the original article in a reasonable and visible manner
- You may not in any way suggest that the licensor endorses you or your use.
- No Derivatives – The material must be distributed in full, including disclaimer, you may not distribute or share modified material.
- No additional restrictions – You may not apply legal terms that legally restrict others from doing anything the licence permits.
- No warranties are given. The license may not give you all of the permissions necessary for you intended use. For example other rights such as publicity, privacy, or moral rights may limit how you use the material.
Disclaimer

Related Articles

Removing Broken Studs and Bolts - Part 2
Things don't always go to plan! Having written a previous article describing methods that have worked for years in removing broken studs, the very next one resisted all of the methods… so different solutions were needed.

Removing Studs On Your Tractor - Video Tutorial
Gordon takes us through the process of removing studs in frustrating circumstances - with older tractors you often come up against issues that have developed over a period of time and put a temporary halt on your restoration.

Torqueing Nuts & Bolts
Torque is used to create tension - in this article contributor Andrew looks at the importance of torque and the typical settings for IH 434 tractors.