International Harvester 434 Major Works Part 7 - Small End Bush

International Harvester 434 Major Works Part 7 - Small End Bush
While this article uses the example of a small end bush, it may be of more general interest in how to achieve close tolerance fits between parts in a well-equipped home workshop. If you don’t have a lathe and/or mill and suitable measuring equipment then you’re likely to need specialist help.
The connecting rod small end bush is an often overlooked area when rebuilding an engine. The tolerances on the fit of the piston pin in this bush are tight so, in the home workshop, can be difficult to measure to the required accuracy and even more difficult to machine to the correct size.
The BC144, BD144 and BD154 engines used on the various Bradford built IH tractors (B250, B275, B414, 276, 434, 444, etc.) have the following specifications:
- Pin diameter 1.1021/1.1023”
- Clearance in bush 0.0005/0.0010”
A working clearance of half to one thou is relatively easy to measure and manufacture with modern state of the art technology, but is asking a lot of us in an ordinary workshop.
There is an oil hole in the top of the con-rod which allows splash lubrication of the piston pin. On this engine there was so much sludge that the holes were blocked and there was between 5 and 7 thou of wear, so the bushes HAD to be replaced.
This article explains the methods that I’ve used along with their strengths and weaknesses. If you need to have these bushes changed, you can decide if you can do the job or need to find a specialist engineering firm to do the work for you.
Measuring
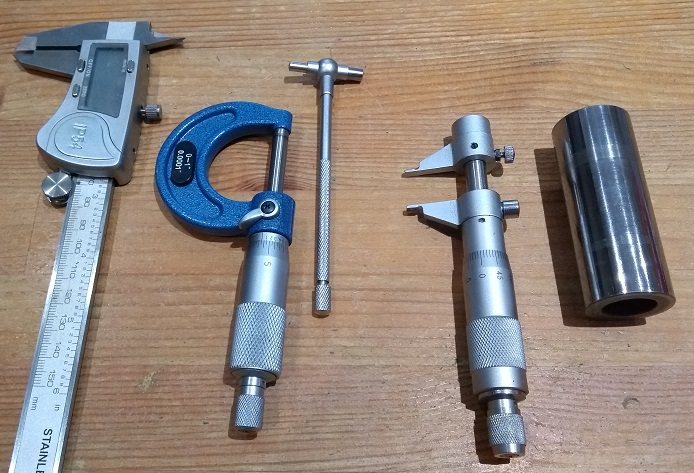
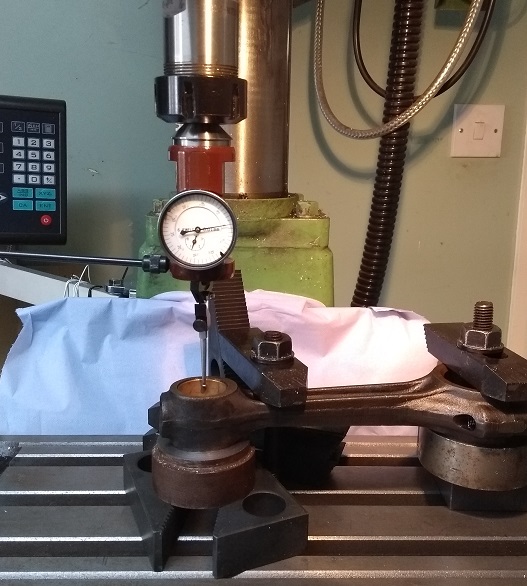
While measuring the piston pin with a micrometer accurately isn’t too difficult, measuring the bush’s bore is more challenging. This photograph shows the most likely options is the home workshop:
- Digital vernier – this generally will not provide the accuracy or repeatability.
- Micrometer with telescopic bore gauge – if you are very good this may just be workable, but probably isn’t.
- Internal micrometer – better than the previous options but easy to get bad readings from burrs (from pressing in the bush) or flared entry (often when reaming.)
- A piston pin – this is our ultimate gauge. At the specified clearance we’re looking for the point when the fit just moves from being tight to slide in/out or turn. If the pin can be rocked or falls through when just lubricated with WD40, the hole is too big.
Trying to get an accurate fit therefore isn’t necessarily going to be easy.
Replacing the Bush
Replacing the bushes is relatively straightforward, but they will have to be finished to size once inserted.
This picture shows new (left) and old (right) bushes along with an insertion tool (bottom) that I made to fit the bushes. As the bushes are of the wrapped style (steel outer with a thin inner bearing surface), there is a risk that they may deform while inserting so there is also an outer support (top) through which both bush and insertion tool slide.
Knowing exactly what size to make these two tools is a bit of an informed guess. The larger diameter of the press tool needs to be able to slide freely through the con-rod and we don’t know that for certain until the bush is out. A starting guess would be the new bush diameter less at least 20 thou (0.5mm.)
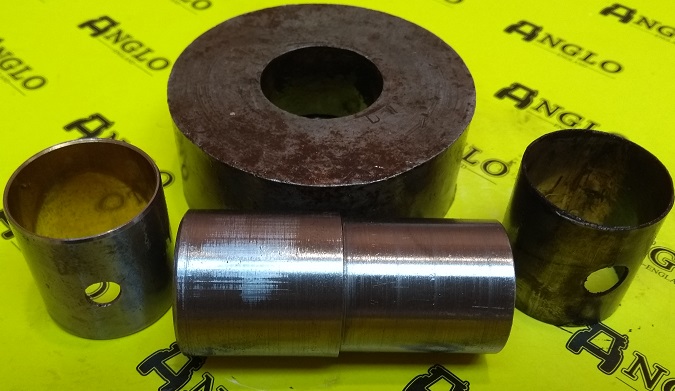
The hole in the outer support needs to be a relatively close sliding fit on the bush before inserting.
The smaller diameter of the insertion tools needs to be a reasonable fit inside the new bush but have an allowance for when the bush is pressed into place – too tight and the tool will stick in the bush and also increase the insertion force. I’ve found that about 20 thou (0.5mm) undersize tends to be about right.
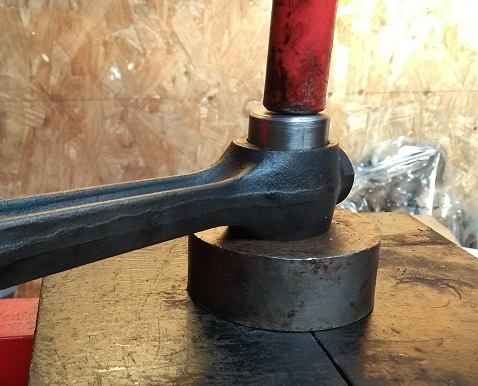
This picture shows the old bush being removed. The insertion tool is used to press out the old bush which slides into the outer support. My little 6 tonne press had no difficulty pressing the bushes out.
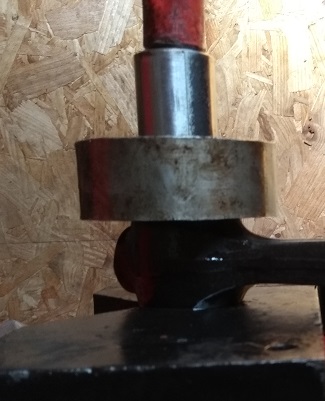
This photograph shows the insertion setup. I oil the bush (inside and out) and the con-rod hole. The actual bush is inside the support tool and just about to be pressed into place.
Take care to ensure that the lubrication hole in the bush is in line with the corresponding hole in the con-rod before starting. If they end up out of alignment you’ll need to press the bush out and try again!
Finishing the Hole to Size
This is the difficult step.
The original bushes seem to have a much thicker finished size bearing layer than the modern replacements. Anglo kindly supplied me sets from two different manufacturers to try. One set required about 27 thou removing, while the other needed about 8 thou. 5 to 8 thou is usually regarded as the normal amount to remove with hand reaming.
As will be explained later, I had problems with centring accuracy in my initial attempts and managed to remove all the bearing material to one side of a couple of bushes. My measurements indicated that IF the finished hole is correctly centred then each type only had about 3 thou of bearing material left… not really a lot, and this makes finishing to size a more demanding task.
I provided feedback to Anglo who notified the supplier so possibly the thickness of the backing material may be reduced in the future. However, I did find ways to find solutions that worked with both suppliers’ bushes.
Centring
As there is very little bearing material left in the bush when finished to size, it is critical that the resizing is exactly around the true centreline of the bush.
I did all the main machining in my mill-drill with the con rod held parallel to the table using height matched spacers to allow through machining.
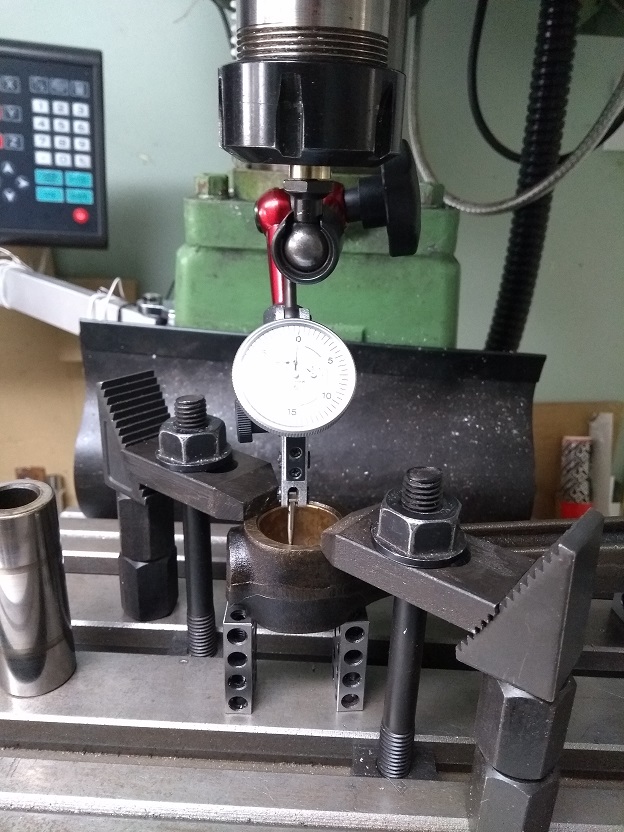
The first attempt used a Chinese made co-axial centring dial indicator as shown in this photograph. These are relatively easy to use as the dial can always face forwards. Unfortunately, after cutting through to the backing steel of the bush, I found that this was out of true by at least 4 thou. This would have been good enough for less critical tasks, but not for this.
The next attempt used a dial test indicator on adjustable arm as in this photograph but I finally ended up with a custom made fitting to hold the indicator via its dovetail into the collet chuck. Also shown in this photograph is the support for the con rod using precision 1-2-3 blocks. The top edge of the bush isn’t a good place to test for centring as it can burr slightly when the bush is pressed in. Test about ¼ of the way down to find a more reliable surface. While this centring method requires quite a bit of neck twisting confirming the point of constant dial reading as the mill spindle is rotated, it provided consistent results.
Reaming
Reaming is the most commonly used way to finish holes to tight tolerances in the home/small workshop. The finished hole size however isn’t an off the shelf size, a custom reamer could be bought but would be expensive, so an expanding reamer is the obvious alternative.
With the reamer held in the collet chuck and carefully increasing its size in small steps, it was possible to ream holes that were intentionally a little tight. The same reamer setting was then used in subsequent bushes with similar results. By “a little tight” I was looking for the point where a piston pin would gently tap through the hole with rubber mallet. Reaming like this will often leave a slight chatter mark in the surface that needs final finishing as described later.
Close examination of the hole showed that this method left a slight bell mouth to the top of the bush so I looked for alternative solutions.
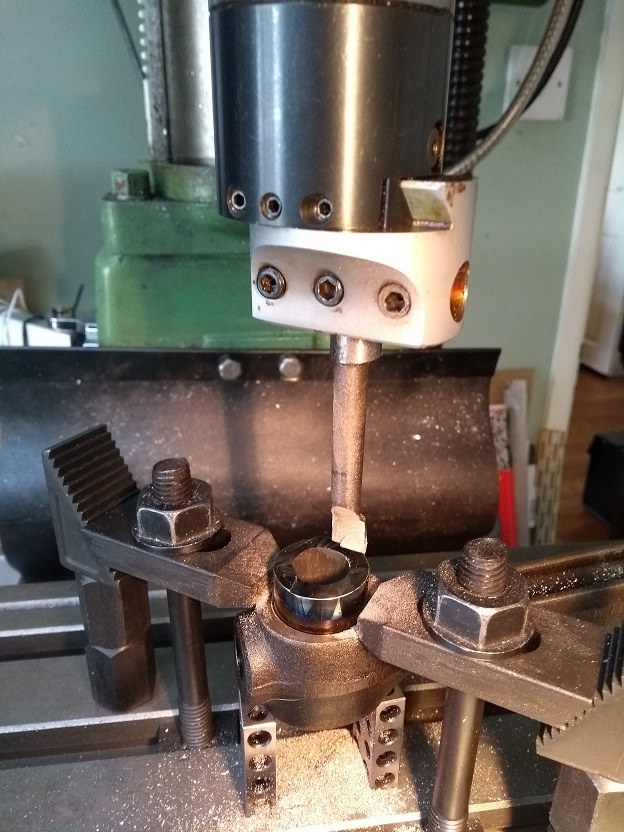
Boring
An alternative to the reamer is a micrometer boring head. Being much shorter than the reamer and a single point cutting tool, its centring in the hole is significantly more accurate. I sharpened the carbide tip on a diamond hone to give a very fine edge. Using several spring passes after each adjustment I increased the hole size to achieve the “a little tight” fit. This hole was nice and parallel and the adjustment, once found, was repeatable on subsequent bushes.
D-bit
D-bits are often used for drilling flat bottomed holes but are also good for deep and/or accurately sized holes. An internet search will provide many examples of how to make them.
A variant is sometimes known as a toolmaker’s D-bit. This has a much shorter cutting end but can achieve even higher precision.
The piston pins from the old pistons are accurately ground and hardened. The ends in the pistons don’t move (normally) and so aren’t worn, therefore are just the correct size to make a D-bit.
This photograph shows a toolmaker’s D-bit one made from a piston pin with the help of a cutting disk in an angle grinder. It is very rough and ready but cuts the bearing material easily. With the pin held in the collet, plenty of cutting fluid and a gentle feed, this cut the bushes to size ok.

Honing/Burnishing
While still within tolerance, the new piston pins were slightly larger (about 1 thou) than the old pins. The new pins were therefore used to prove the final fit in the bushes and help improve the bushes’ surface finish.
This photograph shows the setup for the final finishing of the bushes. My lathe has a variable speed drive and, at the point just before it stops, the torque can be very low. A piston pin, wrapped in several layers of aluminium foil to protect its surface, was held in the chuck. The toolpost was adjusted to provide a supporting face parallel to the chuck and used to support the con rod.
With the lathe running at the very low speed and torque it was possible to hold the end of the con rod while running the lubricated pin into the bush. Moving the lathe carriage towards the chuck helped guide the pin into the bush. If the pin became too tight the torque was so low that the chuck would slow or stop. By backing off and gently re-feeding, the surface of the bush polished and became a better fit.
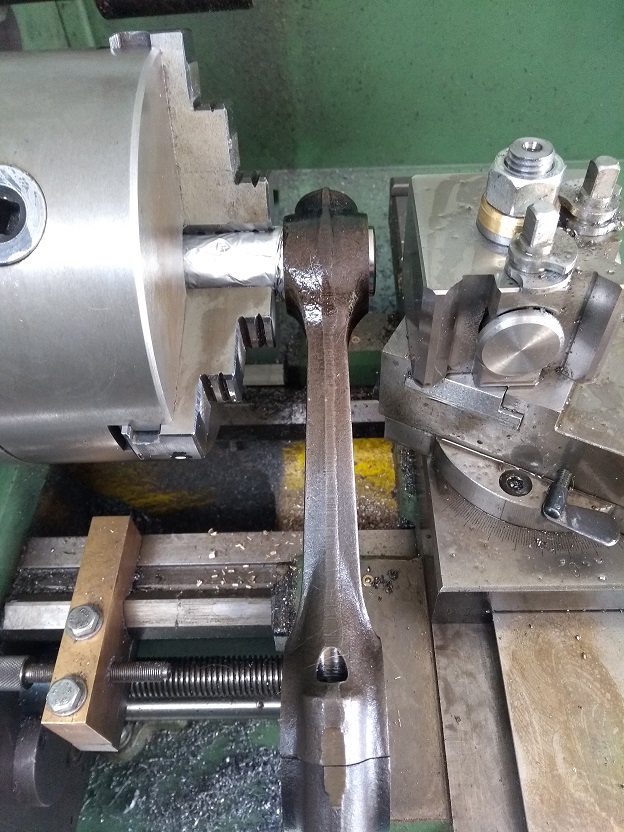
If pushed too hard the pin became hot, expanded and seized. As the torque was so low this wasn’t a problem – when cooled the process could be repeated until a good fit as achieved. While complex to describe, the process was actually quite easy.
The final result was a satin surface finish without machining marks and pins that would slide freely without any sign of play or taper at the sides.
At the time of writing this engine has now run for over 20 hours of hard working without any problems. I personally feel that attention to detail in areas such as these bushes is worth the effort had helps restore the engine to factory standard.
ARTICLE CONTRIBUTED BY ANDREW CHAPMAN
© ANDREW CHAPMAN & ANGLO AGRIPARTS LTD


Licence Terms
You are free to: Share, copy & redistribute the material in original format for any purpose as long as you follow the license terms below:
- Attribution – you must give appropriate credit and provide a link to the original article in a reasonable and visible manner
- You may not in any way suggest that the licensor endorses you or your use.
- No Derivatives – The material must be distributed in full, including disclaimer, you may not distribute or share modified material.
- No additional restrictions – You may not apply legal terms that legally restrict others from doing anything the licence permits.
- No warranties are given. The license may not give you all of the permissions necessary for your intended use. For example other rights such as publicity, privacy, or moral rights may limit how you use the material.
Disclaimer

Related Articles

International Harvester 434 Major Works Part 6 - Camshaft
The camshaft and cam followers (tappets) are often ignored during an engine rebuild - in this article contributor Andrew explains how to check them, and how to change the gear or adjust the end float.

International Harvester 434 Major Works Part 8 - Piston & Liners
This article describes the installation of a new set of liners and pistons in an International Harvester 434.

Ferguson TED20 - Fitting the Release Bearing & Layshaft Bush - Video Tutorial
Gordon fits the release bearing and layshaft bush on his tractor in this latest tutorial in the series following the restoration of his TED20.