Torqueing Nuts & Bolts
Having just had a cylinder head bolt shear when I tried to remove it, this seemed the time to write something on the whys and wherefores for torqueing things down.
1. What is Torque?
Torque is a twisting force and is the multiple of the distance from centre of rotation (e.g. length of a lever) and the force applied at that distance. Almost any units of measurement can be used for either value but the most common for our tractors are:
Imperial
Pound force foot (lbf-ft) which is commonly referred to as pound foot (lb-ft) or foot-pound (ft-lb). Because weight depends on gravity, 1 pound force is the force exerted by 1 pound mass in standard gravity – this may seem a little nit-picking but torque still applies in zero gravity such as when a rocket motor causes the space station to rotate. The size of the units differs with the application so small values could be described in ounce inches (oz-in).
Metric
In the metric SI system, gravity is taken out of the assumption and the unit for torque is the newton metre (N-m or Nm).
When torque is combined with rotation, as in an engine, the product of rotational speed and torque describes the power transmitted.
2. Why Control Torque?
When two components are bolted together we don’t want them to fall apart during use nor do we want to strip threads or break bolts by over tightening. Knowing the safe limits to use for a particular bolt and using a torque wrench means that we can work in this comfort zone.
A second area of importance is to ensure uniformity of force between two mating objects. The most obvious example of this is bolting down a cylinder head where we want uniform pressure across the joint to get a reliable seal.
Steel bolts come in many different types with their physical characteristics determined by material and manufacturing method (heat treatments, rolled vs cut threads, etc.) In simple terms they all share certain characteristics:
- Up to a certain load they will stretch and then revert to their original length when the load is removed… rather like a spring.
- Above this load they will increase in length but maintain some of that increase when the load is removed… rather like a coil spring that is stretched too far.
- At some even higher load they will break… which is when most of us notice that something is wrong!
If a bolt is twisted (torqued) then these same characteristics apply, so a bolt can develop a permanent twist or, ultimately, shear. The twist isn’t normally easy to see but I had a friend with an early shaft drive BMW motorcycle – the shaft had marks on each end that were in line when new but over the years it had developed a ¾ turn permanent twist.
3. Bolt Identification
Most of the time we worry about the thread form of a bolt (e.g. metric, UNC, BSF) and its size, but we’re not normally aware of its strength. Over the years standards have evolved and bolt manufacturers often provide coded information on the heads of bolts.
UNC & UNF
The following table is taken from the workshop manual for an IH 434 with the USA SAE grades added. Where two numbers are quoted these essentially represent the load where the bolt will permanently stretch and where it will break in thousands of pounds per square inch. BSS seems to indicate some old British Standard for bolt strength while even older conventions named them as types A, B, C, T, etc. These grades are often visible on the head of the bolt with a plain head usually being a low grade bolt.
| IH Type | BSS | Manufacturers Markings | SAE J429 Equiv | ||||||
|---|---|---|---|---|---|---|---|---|---|
| 2 | R | R45-55 | BEES 45R55 | NEWALL HITENSILE “R” | SPNR | NEWTON R | SPARTS R | TWLR | 5 |
| - | T | T55-65 | BEES 55T65 | NEW ALLOY “T” or NEWALL HITENSILE “T” | SPNT | NEWTON T | SPARTS T | TWLT | - |
| 4 | V | V65-76 | BEES 65V75 | NEW ALLOY “V” | SPNV | NEWTON V | SPARTS V | TWLV | 8 |
Modern equivalent bolts are easier to identify – the “X” in the picture below is replaced by the manufacturer’s unique identification
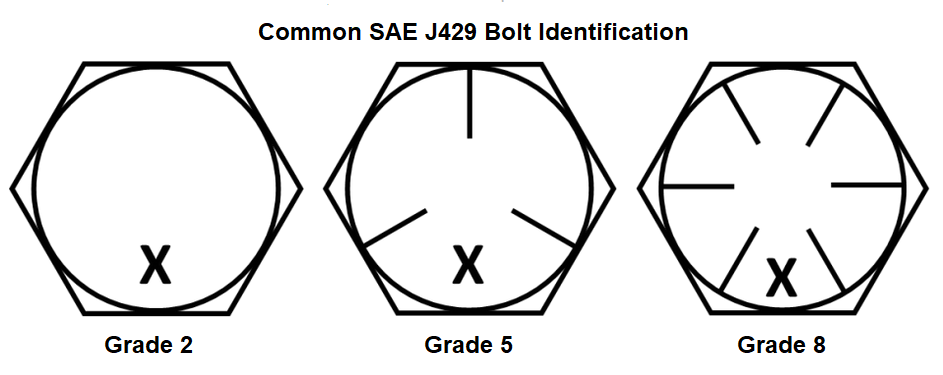
On the IH 434 tractor, IH type 2 bolts (SAE type 5) are used in most locations with IH type 4 bolts (SAE type 8) used for special high load situations like cylinder head, big end, crankshaft bearing retainers and axle extension fixings.
If you’re unsure, there is no problem using a higher strength bolt… but the other way round could lead to an expensive failure.
Metric
Metric bolt grades tend to be easier to identify in that their strength is shown on the bolt head in the form “x.y” where “x” indicates the tensile strength (roughly when it could break) and “y” the percentage of that strength (divided by 10) where it would permanently stretch. So the common general purpose 8.8 bolts would be ok up to 80% of their maximum loading before permanently stretching.
The most common ratings are:
- 4.8 Cheap and nasty!
- 8.8 general bolts, roughly equivalent to SAE type 5. General hardware store bolts.
- 10.9 high tensile bolts, roughly equivalent to SAE type 8
- 12.9 even stronger high tensile bolts
Usage is generally as per the previous SAE ratings with 4.8 types only being used where the designers were trying to cost-cut as much as possible.
4. Typical Torque Settings
The following table is taken from the IH 434 workshop manual for UNC bolts with suggested torque settings in ft-lb. Additional figures shown as (xx) are in N-m. NOTE The manual states “All threads are lubricated with engine oil or chassis grease”.
| Bolt in inches | Type 2 (SAE type 5) | Type 5 (SAE type 8) | ||
|---|---|---|---|---|
| Min | Max | Min | Max | |
| 1/4 | 9 (12) | 10 (13) | 12 (16) | 14 (19) |
| 5/16 | 19 (26) | 21 (28) | 27 (36) | 30 (40) |
| 3/8 | 33 (44) | 37 (50) | 45 (61) | 50 (67) |
| 7/16 | 53 (72) | 60 (81) | 75 (102) | 85 (115) |
| 1/2 | 80 (108) | 90 (122) | 115 (156) | 130 (176) |
| 9/16 | 115 (156) | 130 (176) | 165 (224) | 185 (250) |
| 5/8 | 160 (217) | 180 (244) | 220 (298) | 250 (339) |
| 3/4 | 290 (393) | 320 (434) | 400 (542) | 450 (610) |
Putting these numbers into context, typical torque wrench ranges are:
- 1/4” 5 – 25 Nm
- 3/8” 20 – 110 Nm
- 1/2” 42 – 210 Nm
- 3/4” 68 – 470 Nm
However, if there are values quoted in the workshop manual for your tractor for specific bolts, use them rather than this table.
5. Torqueing Down
As torque is being measured in an effort to determine the clamping force, it is important that the resistance of screwing the bolt into the corresponding thread needs to be consistent.
Unless there is designed intention for friction (and that would be stated in a workshop manual), a bolt should screw in with finger pressure only. Rusty threads on nuts and bolts will totally invalidate any torque settings and also greatly increase the risk that the bolt will seize and break when removal is attempted. If there is resistance then cleaning with a wire brush or even tap and die may be needed… or new parts.
As mentioned earlier, IH recommend oiling or greasing the threads. Some people think that this makes bolts likely to vibrate out over time but the clamping forces between male and female threads plus friction under the nut and bolt heads, with correct torque setting, is all that is needed.
In a small number of cases some form of thread-locking compound may be specified or even pre-loaded on the bolt. In these cases one wouldn’t use oil/grease, but the mating thread would need to be clean and dry.
In the case of tapped holes such as the engine block, it is also important to ensure that the hole is free for its full depth. Failure to clean this area may result in the bolt bottoming in the hole resulting in the torque not resulting in correct clamping force. Also implicit here is that the correct length bolt be used – too long and it could bottom in the hole, too short and there is a risk of stripping the thread.
One further area for consideration is the use of washers:
- On lower strength bolts like the SAE type 5, spring washers are the norm and need to function as such to correctly retain the bolt – fit new washers if the original was missing, broken or just flattened. If locking tabs were used, these will need annealing before reuse although replacement is better.
- On higher load applications (e.g. cylinder head bolts) heavy washers are often used. It is important to ensure that these are fitted in all locations as failure to do so will result in uneven clamping forces due to different friction under the bolt head. Additionally, leaving out the washer could result in the thread bottoming in the hole or the shank of the bolt jamming against the start of the threaded hole.
6. Getting it Wrong
The cylinder head bolt that I mentioned at the start of this article is a good example of getting it wrong. The most obvious errors found were:
- The washer was missing – the clamping wouldn’t have been consistent across the head
- The bolt was dry and had some rust on it – it should have been oiled
- The bottom of the hole in the block was full of debris – risk of bottoming in the hole
- The other bolts differed in length by over 1mm and up to 3mm compared with new bolts so a torque wrench may not have been used
Fixing this problem is still “work in progress” at the moment but, having drilled through the broken piece and used a carbide burr to remove as much as possible, it is clear that the bolt bottomed onto debris in the hole and is rusted solid into the helicoil… which in turn seems to be rusted into the block. Presumably the block was degreased, washed and water was left in the hole with the debris. What should have been a few seconds to unscrew a bolt, could have resulted in a leaking head gasket and has wasted a lot of time and money fixing an avoidable problem.

Licence Terms
You are free to: Share, copy & redistribute the material in original format for any purpose as long as you follow the license terms below:
- Attribution – you must give appropriate credit and provide a link to the original article in a reasonable and visible manner
- You may not in any way suggest that the licensor endorses you or your use.
- No Derivatives – The material must be distributed in full, including disclaimer, you may not distribute or share modified material.
- No additional restrictions – You may not apply legal terms that legally restrict others from doing anything the licence permits.
- No warranties are given. The license may not give you all of the permissions necessary for your intended use. For example other rights such as publicity, privacy, or moral rights may limit how you use the material.
Disclaimer
Related Articles
Removing Broken Studs and Bolts - Tractors
Removing Broken Studs and Bolts on your tractor. A useful article for any tractor restorer or hobbyist providing a number of approaches to remove the inevitable broken stud on old machinery. Part of our Tech Bulletin Series To Restoring Tractors.
Removing Broken Studs and Bolts - Part 2
Things don't always go to plan! Having written a previous article describing methods that have worked for years in removing broken studs, the very next one resisted all of the methods… so different solutions were needed.
Ford 40 Series Torque Settings
Identify the torque settings for your Ford 40 series tractor.


