Removing Broken Studs and Bolts - Part 2

Removing Broken Studs and Bolts – Part 2
Introduction
Having written the previous article describing methods that have worked for years in removing broken studs, the very next one resisted all of the methods… so different solutions were needed.
One of the cylinder head bolts sheared when I tried to remove it from my IH 434. The workshop manual states that all bolts should be oiled or greased before installation but this bolt was rusted in solidly with no sign of lubrication. I assume that when the last rebuild occurred the threads had been degreased, probably left wet, and the bolts replaced dry.

From new these engines use Helicoils in the block as standard, so the bolt screws into the Helicoil which in turn had been screwed into the block.
The next section will describe Helicoils and their use for those who haven’t used them before while the final section will cover the actual problem bolt, how I removed it and replaced the Helicoil too.
Helicoils and Similar Thread Inserts
Thread inserts come in many forms but most commonly:
- Captive nut – typically pressed into sheet metal although some are crimped into place, rather like a pop rivet.
- Externally threaded insert – these are effectively a tube with an internal and external thread. Typically these could be used to repair an oversized hole or provide a stronger fixing into a weaker material.
- Helical insert – this is described in more detail below.
- Mould-in insert – these have an internal thread and an outside profile around which a plastic component is moulded.
- Press-fit insert – these are internally threaded and have a knurled or splined outside diameter. They are pressed into the component which is typically plastic or soft metal.
Helicoil is a brand name for the components made by Böllhoff who have been producing them since 1958. There are now many different variants that can be found on their website but this is the one we are most likely to come across on our machinery.
There are similar products widely available which may or may not use exactly the same profiles… so may not be directly interchangeable.
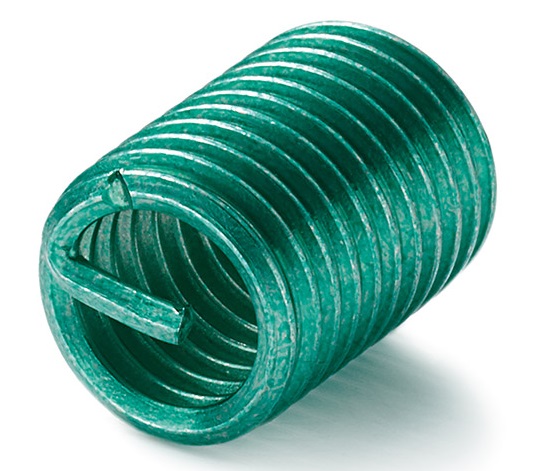
As the name implies, the inserts are coils, typically made of chrome-nickel steel, with a specially designed wire cross-section. Internally they match the thread form of the matching bolt while externally they match the special tapped hole they are screwed into. An easy way to picture this is to think of a coil spring screwed onto a bolt.
This photograph also shows the fitting tang which is used, with a special tool, to screw the coil into the hole. A further tool, or sometimes a simple round punch, is used after installation to break the tang off leaving a clear path for the bolt.
If one twists a coil spring to tighten it, the diameter reduces. The tang on these inserts allows the same action so the insert doesn’t bind on the external thread when it is being fitted, but then springs out to its final size then the tool is released.
So, why use a Helicoil?
- Repair a stripped thread – the Helicoil replaces the thread that has been torn out and often can be inserted without major dismantling.
- Stronger than the surrounding metal – the larger outside diameter spreads the load and the stronger insert material is much less prone to tearing and shearing. With an insert the fixing can often be 30 to 50% stronger than without.
- Smooth low torque resistance surface – unlike a tapped hole with its cut (and therefore often rough) surface, the coil’s wire provides a much smoother and consistent finish. This finish allows the bolt’s thread to slide over it with lower resistance and consequently more uniform clamping force for given torque.
- Corrosion resistance – the modern chrome-nickel steel and its coating makes the joint much less prone to corrosion and rusting in. Unfortunately the IH BD144 and BD154 engines started using Helicoils in 1958 when they were first introduced – the steel used was presumably not as corrosion resistant as the modern inserts, hence my problem!
Broken Bolt and Helicoil Fix
I didn’t want to use any of the heat or welding techniques described in the first article due to risk of damage to the block or liners. Removing this broken bolt however went through a series of steps before finding something that would work.
Magnetic Drill
I bought this drill a few years ago when I nearly broke my wrist trying to drill a large hole freehand with a large blacksmith drill.
This drill uses an electromagnet to clamp it to a suitable surface with a clamping force potentially of over 1 tonne. It can take drills of up to 13mm and special cutters of up to 42mm which can drill up to 50mm deep. On something like an RSJ or trailer chassis it is fantastic, but it needs a suitable flat surface to stick to.
My intention was to use an end mill in the chuck and mill down through the centre of the bolt with the drill clamping on the flat top of the block. However, when I came to try the idea in practice there were a couple of significant problems:
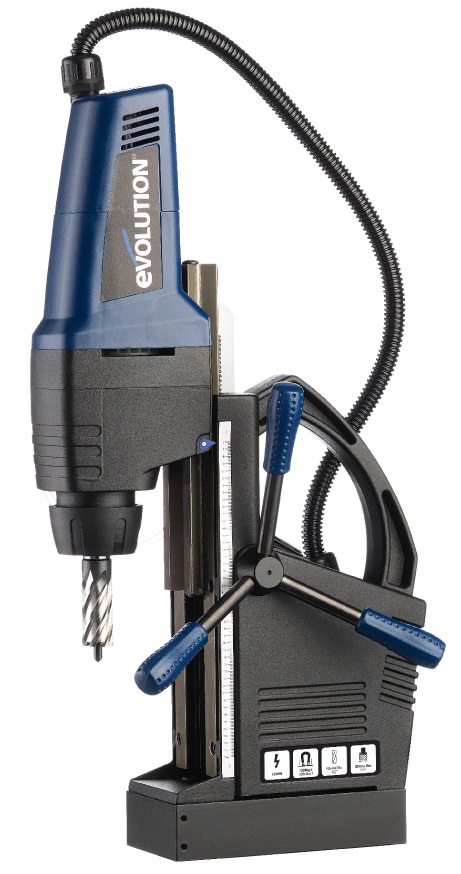
1. The high magnetic clamping force needs minimal air gap but the liners stand slightly proud of the block to ensure the head gasket seals correctly. This gap greatly reduces the clamping force.
2. The magnets actually need steel to clamp to! Unfortunately, the magnets lined up with the bores so there was nothing to clamp to.
In other situations this method would have probably worked well, but not here.
Sleeve and Extended Drill Bit
The next approach was to use the cylinder head (held in place by other bolts) as a guide with a sleeve turned on the lathe to centre a 6mm drill over the bolt. Drilling through the depth of the cylinder head required a very long drill bit, so I made an extension from a round bar with the drill fixed into it using epoxy resin.
This approach worked moderately well in that it drilled the hole vertically but, on inspection, was off centre by at least 1mm. I’m not sure exactly where this error crept in – it may have been a poor quality drill (I didn’t want to use one of my best ones in the special extension) or a hard spot in the bolt.
I then tried a stud extractor but, with the maximum force that I felt comfortable applying, the bolt still wouldn’t move. I didn’t want to risk breaking the stud extractor as that would have made things even worse.
Drilling Out
Even though the drilled hole was off-centre, the next step was to enlarge the hole as much as possible without breaking through into the Helicoil.
I don’t have any left-hand drills as these would potentially have helped break the bolt or Helicoil free. I looked online but a set of suitable carbide drills would have been expensive and, due to Covid and Christmas the lead time to get any was very long. With hindsight it may have been worth buying a set and waiting.
Even with the hole opened out and trying the stud extractor again, the bolt wouldn’t move.
Carbide Burr
So with the hole almost to the thread on one side, another approach was needed. I bought some carbide burrs at one of the tractor shows – they were a little on the large side but I tried one to see how it would work “pulling” the hole sideways to centre it.
This seemed promising so I bought some smaller ones via the internet.
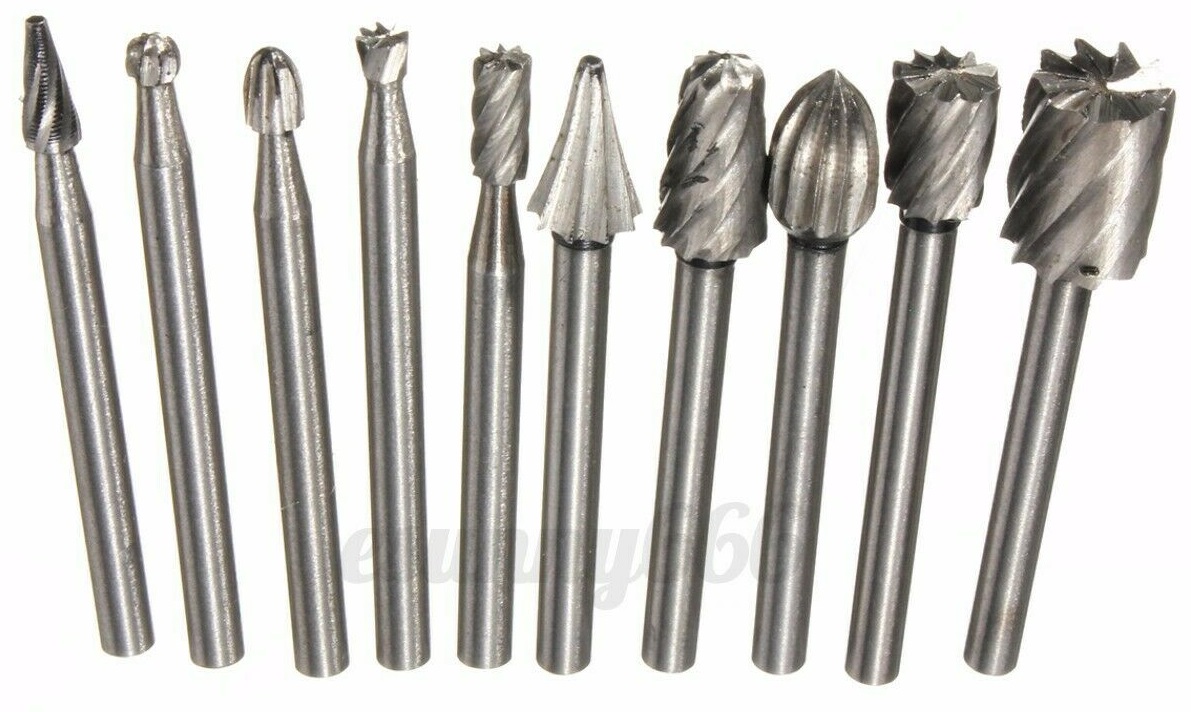
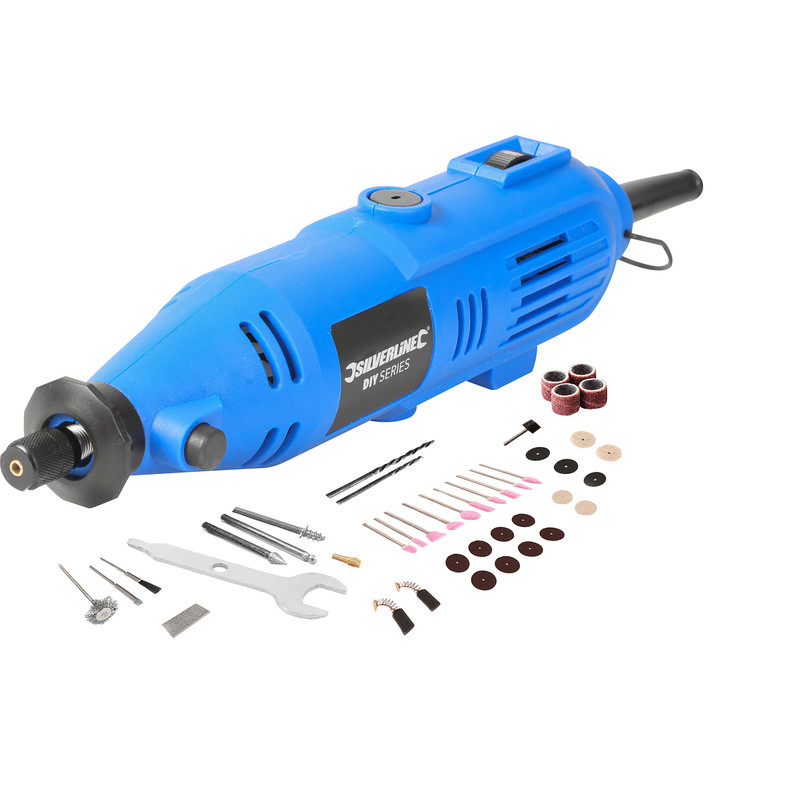
These have 3mm shanks and I used them with this high speed drill.
They were surprisingly effective provided that the hole was cleared regularly using a magnetic pickup tool.
After a slow process the remains of the bolt were largely removed but I wanted to replace the Helicoil as it almost certainly had become damaged by the burr.
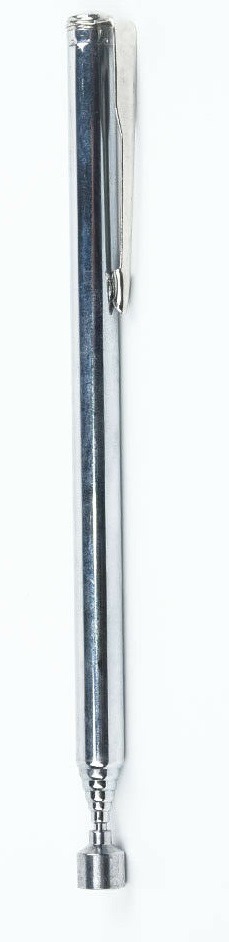
Helicoil produce special tools to remove the inserts. The tool has a trapezoidal carbide end (a triangle with the top cut off) on a handle which is knocked into the coil so it grabs into the metal and allows it to be unwound. Unfortunately the coils on my engine are inserted relatively deeply and such a tool wouldn’t work as it would bind on the block before touching the coil. So another workaround was needed…
Helicoil Drill and Tap
This is a picture of the Helicoil kit I used. Different kits are needed for each different thread size.
The coils come in different lengths, usually denoted as “xd” where “d” is the outside diameter of the bolt’s thread and “x” is usually 1, 1.5 or 2. “1.5d” is the most common but the ones in the block seemed to be “2d”. Items 1, 2 and 3 are the three lengths.
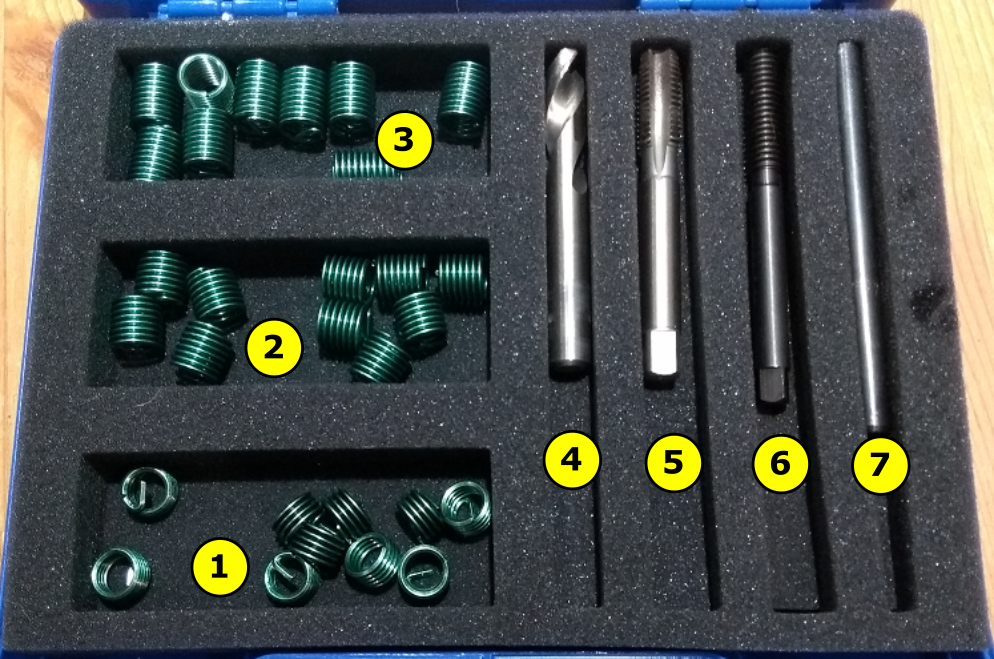
When repairing a stripped thread or making a new tapped hole, drill “4” is the correct tapping size and tap “5” the correct tap to allow the coil to be inserted.
The coil is screwed onto the insertion tool “6” and wound into the hole until the end of the coil is at least ¼ turn below the surface. For the IH engines the coils are inserted more than 1 turn below the surface.
With the coil in place, tool “7” is inserted into the coil and given a sharp tap with a hammer. This breaks the insertion tang off – remove it with a magnet.

So that’s how it should go, but the old coil was rusted into the block and still didn’t want to come out. A set of left-handed drills would probably have made removal MUCH easier – when the drill started to bite into the coil rotating anti-clockwise the coil should reduce in diameter, pull away and gradually wind out.
The slower alternative which worked was to start to drill the coil to tapping size with tool “4” using my battery powered drill.
The torque limiter on the drill kept restricting how far it would drill so I then ran the tap (tool “5”) into the hole until it pulled the leading edge of the coil away from the outside of the hole and became too stiff to turn. Back to the drill to take of the leading edge then back to the tap… and keep repeating the process until the coil eventually came free and wound its way down to the bottom of the hole. A further pass with the tap lifted the leading edge of the coil enough to grab with a pair of long-nosed pliers and wind it out. A final pass with the tap cleaned the hole and the remaining debris could be removed.
Inserting the new Helicoil using the previously described procedure was easy.
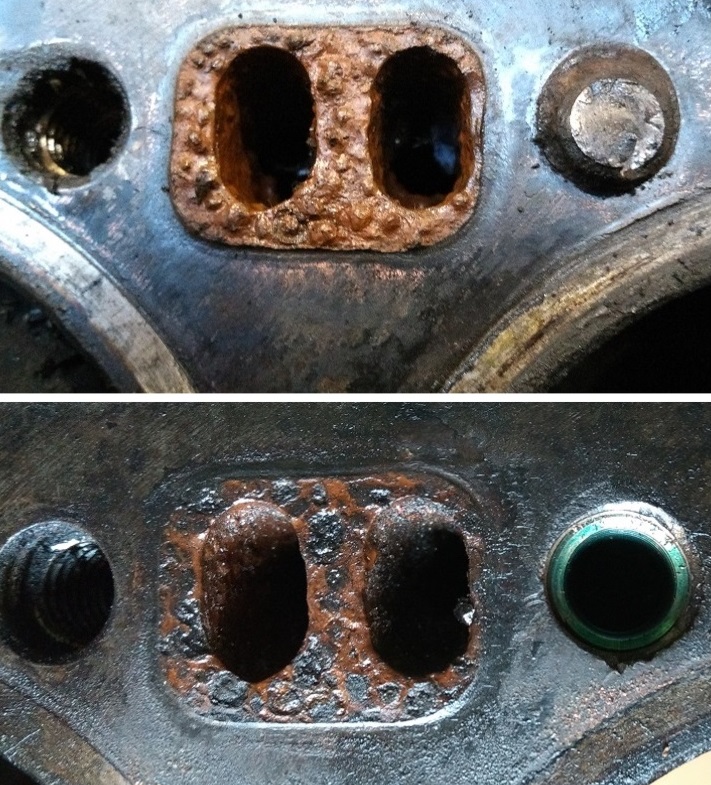
This picture shows the before and after – a lot of work because someone didn’t oil the threads initially.
ARTICLE CONTRIBUTED BY ANDREW CHAPMAN
© ANDREW CHAPMAN & ANGLO AGRIPARTS LTD


Licence Terms
You are free to: Share, copy & redistribute the material in original format for any purpose as long as you follow the license terms below:
- Attribution – you must give appropriate credit and provide a link to the original article in a reasonable and visible manner
- You may not in any way suggest that the licensor endorses you or your use.
- No Derivatives – The material must be distributed in full, including disclaimer, you may not distribute or share modified material.
- No additional restrictions – You may not apply legal terms that legally restrict others from doing anything the licence permits.
- No warranties are given. The license may not give you all of the permissions necessary for your intended use. For example other rights such as publicity, privacy, or moral rights may limit how you use the material.
Disclaimer

Related Articles

Removing Broken Studs and Bolts - Tractors
Removing Broken Studs and Bolts on your tractor. A useful article for any tractor restorer or hobbyist providing a number of approaches to remove the inevitable broken stud on old machinery. Part of our Tech Bulletin Series To Restoring Tractors.

Removing Studs On Your Tractor - Video Tutorial
Gordon takes us through the process of removing studs in frustrating circumstances - with older tractors you often come up against issues that have developed over a period of time and put a temporary halt on your restoration.

Torqueing Nuts & Bolts
Torque is used to create tension - in this article contributor Andrew looks at the importance of torque and the typical settings for IH 434 tractors.